


Pre-Semester Course Checklist
The Distance Education team has created this checklist to assist faculty in preparing their courses for the new semester. In each section of the checklist, the relevant Canvas Guides are linked with step-by-step instructions and videos for each task. If you need additional support, please email the Distance Education team at online@fullcoll.edu.
Step 1: Getting Started
You can start these initial steps as soon as your official course shell is available in Canvas. Please note that official course shells are generally available once the searchable class schedule for that semester is live.
Import Existing Course Content
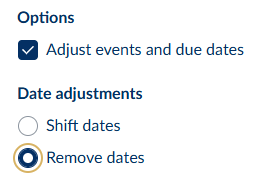
Use the Canvas Course Import Tool to copy an existing course into your official Canvas course shell. Please note that we recommend removing the due dates to avoid gradebook issues.
Adjust Course Navigation
Simplifying your course navigation helps your students focus on what is important in your course and reduces potential distractions.
Recommended Course Navigation Items:
- Home
- Announcements
- Syllabus
- Modules
- Grades
Modules should be the entry point to your course content, so hide links like Assignments, Pages, Files, Quizzes, etc.
Set Home Page/Front Page
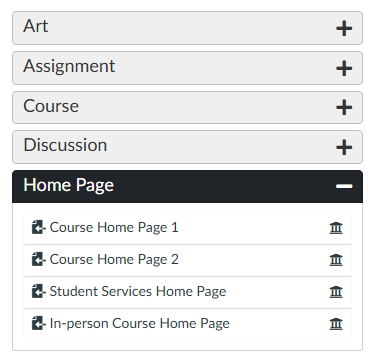
If you don’t already have a home page to welcome your students to your course, use the Template Content tool in the DesignPLUS Sidebar to create one.
- Create a new Canvas Page
- Use the blue rocket ship in the upper right corner to launch the DesignPLUS Sidebar
- Go to the Add New Elements tab and add the Template Content tool to the page
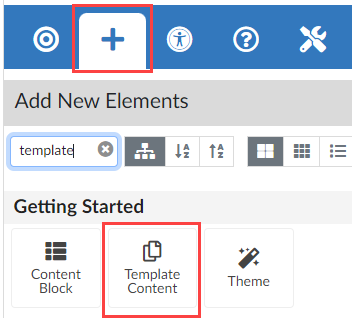
- Open the Home Page expander and select one of the options to add it to your page
- Follow the instructions embedded in the template to customize it for your course
Relevant Canvas Guides:
Set Up the Gradebook
Ensure your gradebook settings align with your syllabus, and the gradebook view is set up to make grading as seamless as possible throughout the semester.
- Create Assignment Groups: create groups for assignments, quizzes, discussions, etc., and make sure all assignments are in the correct group
- Set up Assignment Group Weights (optional): ensure that each assignment group is weighted as listed in your syllabus (ex: Quizzes 25%, Discussions 15%, etc.)
- Set Up Late Submission and Missing Submission Policies: automate late and missing assignment policies to ensure consistency
- Configure Grade Posting Policies: control when students see their grades and grade feedback
- Organize Gradebook Columns: set up the gradebook so it is easy for you to navigate
- Familiarize Yourself with the Different Gradebook Filters and Views
Review Course Details Settings
In your Course Navigation, go to Settings > Course Details. There are many settings in this tab, but don’t get overwhelmed. Review our recommendations below:
- Course Image: add a course card image to make your course stand out on the Canvas Dashboard. (Recommended size is 262px x 146px)
- Show recent announcements on the course home page: check this box and choose the number of announcements you would like displayed. We recommend selecting 3 or fewer, as more than that pushes your home page content down too far
- Let students create discussion topics: generally NOT recommended, so ensure that box is not checked
- Let students attach files to discussions and let students edit/delete their discussion replies: both of these are generally recommended, so ensure those boxes are checked
- Let students organize their own groups: these groups cannot be used for graded assignments, so we generally do not recommend this box be checked
- Disable comments on announcements: this one is up to you! If you would like your students to be able to comment/reply to your course announcements, uncheck this box
Save your selected settings using the Update Course Details button.
Step 2: Review and Revise Content & Design
Refresh and reorganize your course content as needed.
Review and Update the Syllabus
The Distance Ed team highly recommends using the Canvas Syllabus tool. If you would like to follow a template, use the Template Content tool in the DesignPLUS Sidebar.
- Select Syllabus in your course navigation
- Select Edit
- Use the blue rocket ship in the upper right corner to launch the DesignPLUS Sidebar
- Go to the Add New Elements tab and add the Template Content tool to the page
- Open the Syllabus expander and select the FC Example Syllabus to add it to your page
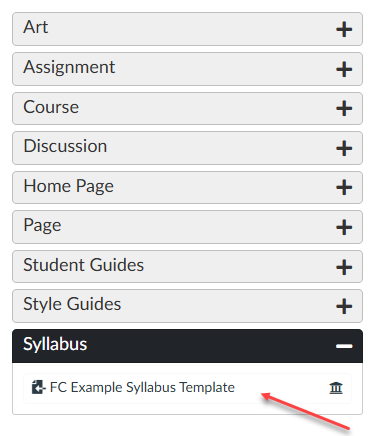
- Follow the instructions embedded in the template to customize it for your course
Review and Revise Course Content & Design
Review and revise your course content and design as needed.
- Think about what worked and what didn’t last semester and make revisions accordingly.
- Use the DesignPLUS Course Search tool to remove any references to previous semesters, other colleges, etc.
- This may also be a good time to touch base with your Distance Education Division Rep (DEDR) if you have any content, assignments, etc. to review or troubleshoot.
- If you want to make any major course design changes, schedule an instructional design consultation.
Edit Module Settings, Requirements, and Prerequisites
We do not want students to see all of the course content at once. It is overwhelming for the student, and it does not give you enough time to revise your content as the semester moves along. However, as you will see in a later section of the checklist, we do want you to publish the course before the course start date. Leverage the Canvas Module settings to ensure that happens seamlessly:
- Lock all of your modules. When your modules are locked, students cannot access any of the module items until that lock date passes. This is what allows you to publish your course before the course start date and only allow your students access to the Home Page and Syllabus content.
- You can also set module requirements and module prerequisites as appropriate for your course. These are optional, but can help ensure your students are moving through the course content in the intended sequence.
Ensure Accessibility
Fullerton College faculty have access to a course-level accessibility checker and it is recommended to run it on each course prior to publishing it for students. UDOIT scans an entire Canvas course, calculates the accessibility score, generates a detailed report, and provides guidance on addressing common accessibility issues.
Canvas Content
UDOIT scans the HTML of the following Canvas content items in your course:
- Announcements
- Assignments
- Discussions
- Pages
- Syllabus
- Module URLs
To get started with UDOIT, you must add it to your course navigation:
- Select Settings in your course navigation.
- Select the Navigation tab.
- Scroll down to the UDOIT Cloud option and use the three dots to the right.
- Select Enable.
- Save your changes to the menu.
To run a UDOIT scan:
- Select UDOIT Cloud in the course navigation. UDOIT will automatically start scanning. If the scan does not automatically start, select the blue Scan Now button. Depending on the size of your course, the scan will take a few minutes.
- Once the scan is complete, select either the Home or UFIXIT links.
- You will see your accessibility score and a list of errors (issues that must be addressed) and suggestions (issues that generally should be addressed but may be ignored depending on the context within the course).
Watch the two videos below to learn about the UDOIT Home Page and how to make fixes within the UDOIT interface:
Files
The latest version of UDOIT also checks your files for accessibility errors:
If you run into accessibility issues you aren’t sure how to address, schedule an accessibility consultation.
Step 3: Get Course Ready for Students
These finishing touches ensure a seamless, student-friendly experience.
Add/Review Assignment Due Dates
Ensure your Canvas Assignment due dates match what is listed in your course syllabus.
- Select Assignments in your course navigation
- In the kebab menu in the upper right corner, use the Edit Assignment Dates option to update due dates and availability dates as needed
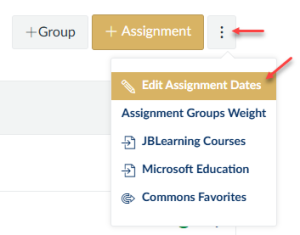
- Verify your assignment groups are accurate if you are using weighted totals for grading
Review and Schedule Announcements
- Review all of the announcements in the course
- Delete announcements that are no longer needed
- For the remaining announcements, select Available From dates, so they are sent out at the appropriate times throughout the semester

Run the Canvas Link Validator
Use the Validate Links in Context tool to check for broken links or links that point to other courses.
Preview
It is important to preview your course as a student would see it. There are several tools you can use:
Step 4: Welcome Your Students
Welcome your students to your course approximately one week before the course start date.
Publish
It is time to publish your course!
- Verify that your course home page and syllabus are published
- Ensure your modules are locked (go back to the Step 2 section if you need a refresher!)
- On the course home page, change the Course Status from Unpublished to Published

Send Welcome Letter Announcement
Send a welcome letter announcement approximately a week before the course starts.
Items to consider including:
- course start date
- how to access the course
- first week expectations/assignments
- textbook/required course materials
- technology and Canvas support information
- instructor bio
- anything else that will help students be successful in that first week