


Document Accessibility Guide
Creating accessible documents ensures students with disabilities have equivalent access to instructional content. The most common formats at Fullerton College are Microsoft Word documents, PowerPoint slides, and PDF files. All of the accessibility principles also apply and look very similar in the Google products. A section at the end of the page outlines the key differences between the Microsoft and Google products.
Use the information and tips in the expanders below as you are creating or remediating your course documents:
Accessible Word Documents
Alt Text for Images
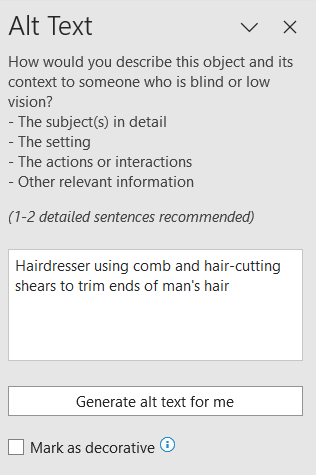
Images, charts, and objects within documents should be described using alternative text descriptions. The alt text is necessary for screen reader users to interpret the information contained in the image.
To add alt text in Word:
- Select an image
- Choose the Picture Format tab
- Select Alt Text
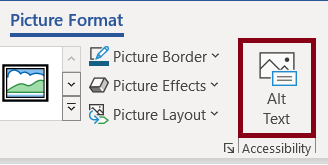
- Enter the alt text in the Description box. If the version of Word you are using also has a Title field, leave it blank. Use the “Mark as decorative” checkbox below the alt text field if the image is purely decorative and contains no instructional content.
Headings
Headings act much like an outline of your document. Moving from heading to heading is the number one method people who use assistive technologies employ to navigate to the content they need.
To add Headings in Word:
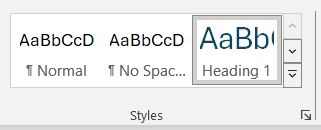
- Highlight the text you want to turn into a Heading
- Go to the Home tab
- In the Styles group, select the appropriate Heading level
Important Headings Notes:
- The first heading in a document should be Heading 1.
- Do not use the Title style as it does not add structure to your document.
- Do not skip heading levels.
- Depending on the version of Word you are using, the default blue used for some of the Heading Styles does not have sufficient color contrast, so make sure you change the color to a darker color as needed. You may also consider updating to the latest version as that issue has been fixed.
Color Contrast and Usage
Color Contrast
Ensure text colors are high contrast (black text on white, dark blue on white, etc.):
- Contrast ratios must be at least 4.5:1 for regular text and 3:1 for large text
- Stick to the default Word text color as much as possible
Color Usage
Meaningful information should not be conveyed by color alone.
Example: “All problems in red must be turned in for homework each week.” A student using a screen reader or one who has any type of colorblindness would not be able to tell which problems to turn in each week. It is fine to use color, but also ensure you are using another method. An asterisk would work well in this use case.
Font Size and Style
There are many fonts to select from when creating a document, but it is important to choose fonts recommended for both readability and availability across computer platforms. Selecting one of the following sans serif font styles makes documents accessible to the largest audience possible: Arial & Verdana (12 pt size).
Sans serif fonts improve readability for individuals with low vision and other types of print disabilities (e.g., dyslexia).
Links
While links are the easiest method to direct students to web pages, hyperlinks can also have potential accessibility challenges.
Common Hyperlink Mistakes
- Redundant link text: screen reader software announces a link is present, so there is no need to include “link” or “link to” in hyperlink text.
- Ambiguous link text: screen reader software can scan a page and create a “links list”, which allows the student to listen to a list of available hyperlinks and navigate directly to the desired link as opposed to being forced to listen to the entire page. Hyperlink text such as “read more” or “click here” does not provide the student with any information about the actual link.
Correctly Formatted Hyperlinks
- Identify the purpose or function of the hyperlink as part of the hyperlink name.
- Be as descriptive as possible without being too wordy. Remember that the student will have to listen to the whole link before moving to the next link on the list.
- Integrate the link into your sentence. Your sighted students will see the link, and screen readers will identify the link.
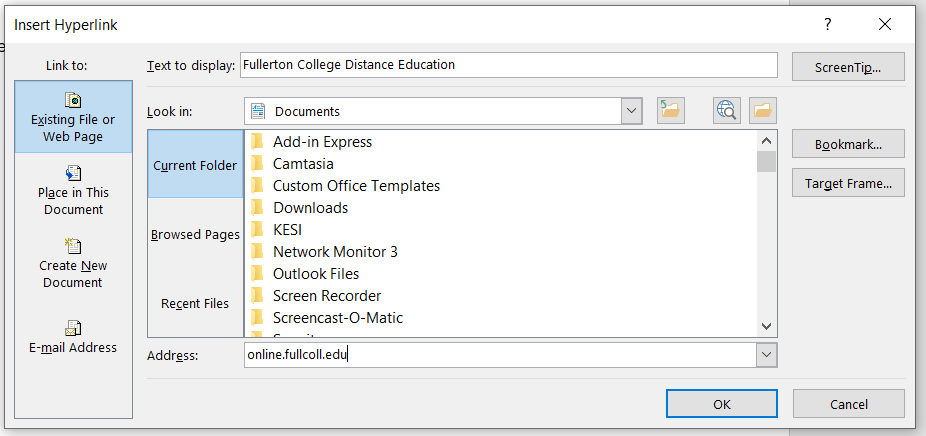
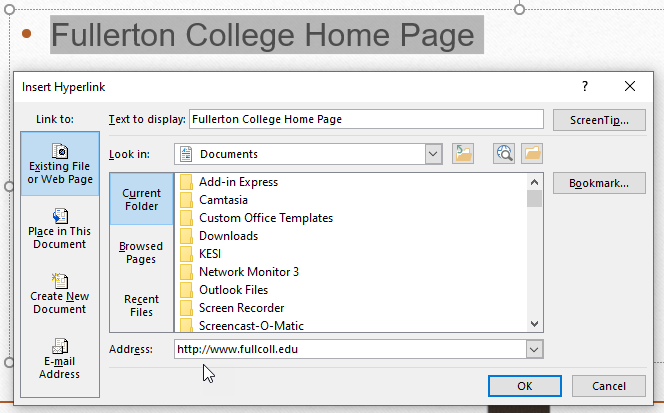
Adding Hyperlinks in Word
- Highlight the text you want to link behind
- Go to the Insert tab and select Link (or right-click and select Link)
- Paste the URL in the Address field at the bottom of the dialog box
- Press OK
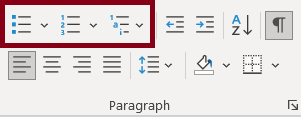
Lists
Use the Bullets, Numbering, and Multilevel Lists tools to create lists. Lists allow screen reader users to determine list length and organization. Lists also naturally chunk content within the document, improving readability for individuals with low vision or learning/cognitive challenges.
To add a list:
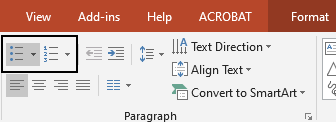
- Go to Home
- Use either the Bullets, Numbering, or Multilevel List functions as appropriate for your content
Tables
Tables should only be used to provide data and not for page layout purposes. Use simple tables (i.e., no blank cells and no merged cells, rows, or columns) whenever possible.
To create an accessible table in Word:
- Go to Insert > Table > select the appropriate number of columns and rows
- Enter all of your table data
- Select the first cell of the table
- Select Layout > Repeat Header Rows
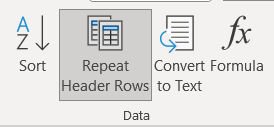
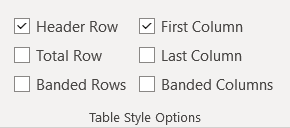
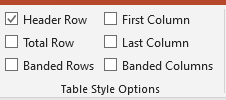
- Select Table Design > check the boxes for Header Row (required) and First Column (optional depending on your table data)
Important table notes:
- Avoid merged cells
- Avoid blank cells
- Tab through your table to ensure the reading order is logical
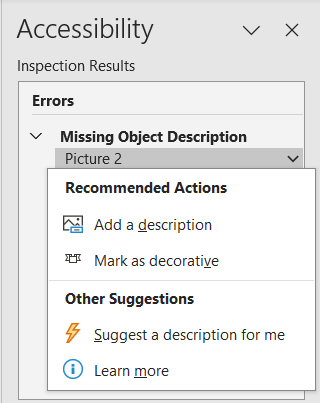
Accessibility Checker
Microsoft Word has a built-in accessibility checker to assist you in remediating your documents. It is an excellent tool, but, as with any automated checker, it does not catch everything.
To check a document:
- Select the Review tab > Check Accessibility or go to File > Info > Check for Issues > Check Accessibility

- If there are accessibility issues, they will appear in the Accessibility pane to the right of your document
- Choose an issue to see the Recommended Actions for remediation
Converting Word Documents to PDF
The easiest way to create an accessible PDF is to create your documents accessibly in Microsoft Word first. Remediating an inaccessible PDF file is much more difficult than simply creating accessibly from the beginning!
There are multiple ways to create a PDF document from Word, but the steps listed below will help you ensure that the work you did to make the Word document accessible transfers to the PDF.
Important Notes:
- You can still use options such as File > Export > Create Adobe PDF or File > Save As Adobe PDF, but you will lose some of your document properties with those methods. It isn’t the end of the world as you can add them back if you have access to Adobe Acrobat Pro, but we want to provide you with the most seamless Word to PDF transition.
- Whatever you do, do not Print to PDF! This will create an inaccessible, image-based PDF.
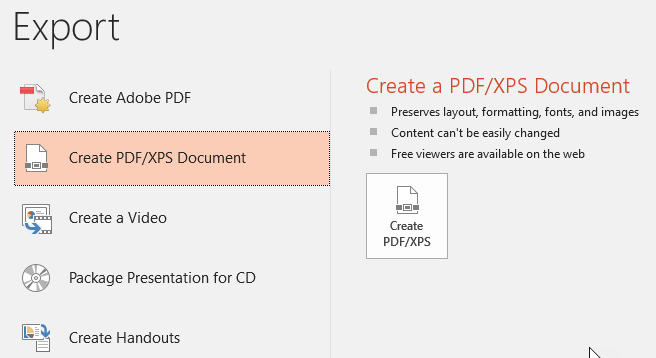
When you are ready to create your PDF:
- Make sure you have added a Title to your file. (Go to File > Properties, then type in an appropriate title in the Title field)
- In Word, select File > Export
- Select Create PDF/XPS Document
- Select Create PDF/XPS button

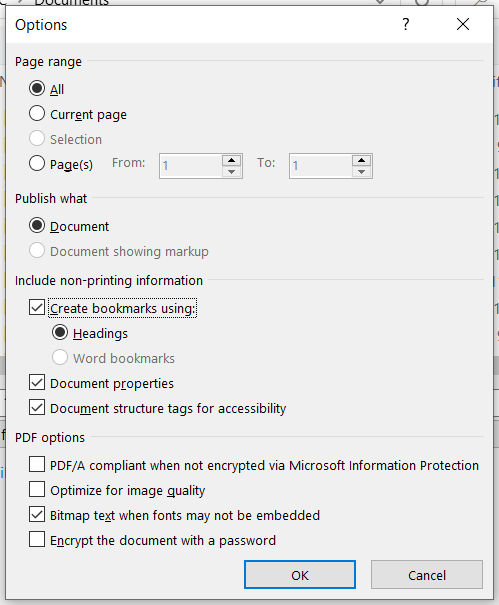
- In the Publish as PDF or XPS window, enter a File Name and then select the Options button
- In the Options dialog window, make sure the following options are selected:
- Create bookmarks using — Headings: this selection automatically creates bookmarks in your PDF document using the heading styles that you have added in Word
- Document properties: this selection ensures that the document title and author information are carried over into your PDF
- Document structure tags for accessibility: this selection ensures that any structural elements you created in your Word document (i.e., lists, headings, etc.) are tagged as such in your PDF
Accessible PowerPoint Slides
Slide Layouts and Titles
Layouts
It is highly recommended that you use the built-in slide layouts when creating a PowerPoint file. These layouts provide heading structure and reading order for students who use screen reader software. The built-in layouts also ensure that any PDF file you create from the PPT is more accessible.
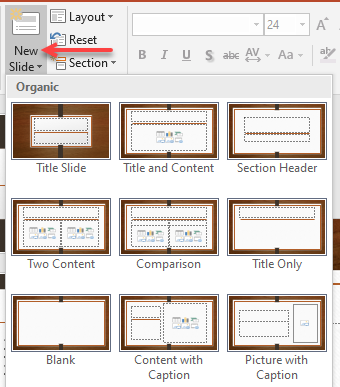
To use the slide layouts:
- In the Home tab, select New Slide
- Choose from the list of different layouts
Unique Slide Titles
Unique titles assist screen reader users with identifying when they move to a new slide in the presentation. Each slide must have a unique title!
Alt Text for Images
Images, charts, and objects within slide decks should be described using alternative text descriptions. The alt text is necessary for screen reader users to interpret the information contained in the image.
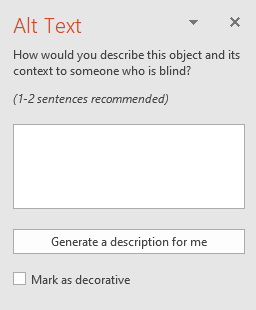
To add alt text to an image in PowerPoint:
- Select an image
- Select the Picture Tools Format tab
- Select the Alt Text button

- Enter the alt text in the Description box. Use the “Mark as decorative” checkbox below the alt text field if the image is purely decorative and contains no instructional content.
Color Contrast and Usage
Color Contrast
Ensure text colors are high contrast (black text on white, dark blue on white, etc.):
- Contrast ratios must be at least 4.5:1 for regular text and 3:1 for large text
- Stick to the default text color as much as possible
Color Usage
Meaningful information should not be conveyed by color alone.
Example 1: “All problems in red must be turned in for homework each week.” A student using a screen reader or one who has any type of colorblindness would not be able to tell which problems to turn in each week. It is fine to use color, but also ensure you are using another method. An asterisk would work well in this use case.
Example 2: Charts that only use color to identify categories.
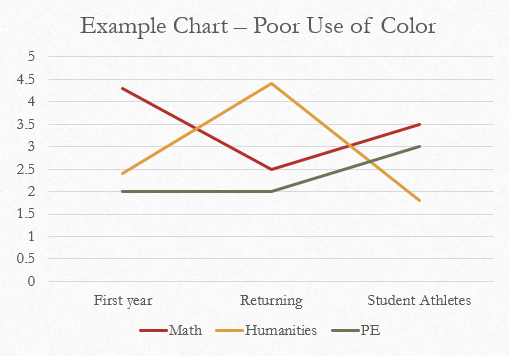
Use line types in addition to color.

Font Size and Style
There are many fonts to select from when creating a slide deck, but it is important to choose fonts recommended for both readability and availability across computer platforms. Selecting one of the following sans serif font styles makes presentations accessible to the largest audience possible: Arial & Verdana (24 pt size).
Sans serif fonts improve readability for individuals with low vision and other types of print disabilities (e.g., dyslexia).
Links
While links are the easiest method to direct students to web pages, hyperlinks can also have potential accessibility challenges.
Common Hyperlink Mistakes
- Redundant link text: screen reader software announces a link is present, so there is no need to include “link” or “link to” in hyperlink text.
- Ambiguous link text: screen reader software can scan a page and create a “links list”, which allows the student to listen to a list of available hyperlinks and navigate directly to the desired link as opposed to being forced to listen to the entire page. Hyperlink text such as “read more” or “click here” does not provide the student with any information about the actual link.
Correctly Formatted Hyperlinks
- Identify the purpose or function of the hyperlink as part of the hyperlink name.
- Be as descriptive as possible without being too wordy. Remember that the student will have to listen to the whole link before moving to the next link on the list.
- Integrate the link into your sentence. Your sighted students will see the link, and screen readers will identify the link.
Adding Hyperlinks in PowerPoint
- Highlight the text you want to link behind
- Go to the Insert tab and select Link (or right-click and select Link)
- Paste the URL in the Address field at the bottom of the dialog box
- Press OK
Lists
Use the Bullets and Numbered Lists tools to create lists. Lists allow screen reader users to determine list length and organization. Lists also naturally chunk content within the presentation, improving readability for individuals with low vision or learning/cognitive challenges.
To add a list:
- Go to the Format tab
- Use either the Bullets or Numbered List tools as appropriate for your content
Tables
Tables should only be used to provide data and not for slide layout purposes. Use simple tables (i.e., no blank cells and no merged cells, rows, or columns) whenever possible.
To create an accessible table in PowerPoint:
- Go to Insert > Table > select the appropriate number of columns and rows
- Enter all of your table data
- Select the first cell of the table
- Select Table Tools Design > check the boxes for Header Row (required) and First Column (optional depending on your table data)
Reading Order and Outline View
Adjusting Reading Order
The reading order of each slide should be checked, especially if you have added text boxes to a predefined slide layout.
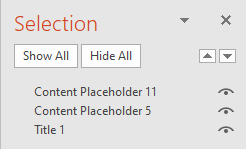
- Select Home > Arrange > Selection Pane
- A list of all of the slide elements will appear in the Selection Pane. These items should be in a logical reading order. Please note that the items listed will be read from the bottom up, so your slide title should be the last item in the list.
Outline Panel
The outline panel, which can be found using View > Outline View, contains a text outline of all of your presentation content. This outline view is particularly useful as it can help you ensure your slide titles are unique and informative, and your reading order is logical.
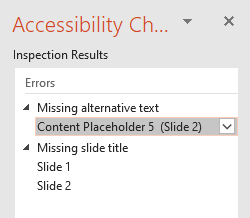
Accessibility Checker
Microsoft PowerPoint has a built-in accessibility checker to assist you in remediating your slide decks. It is an excellent tool, but, as with any automated checker, it does not catch everything.
To check a PPT file:
- Go to the Review tab > Check Accessibility or go to File > Info > Check for Issues > Check Accessibility

- If there are accessibility issues, they will appear in the Accessibility pane to the right of your document
- Select an issue to see the Recommended Actions for remediation
Converting PowerPoint to PDF
The easiest way to create an accessible PDF is to create your presentation accessibly in PowerPoint first. Remediating an inaccessible PDF file is much more difficult than simply creating accessibly from the beginning!
There are multiple ways to create a PDF document from PowerPoint, but the steps listed below will help you ensure that the work you did to make the presentation accessible transfers to the PDF.
Important Notes:
- You can still use options such as File > Export > Create Adobe PDF or File > Save As Adobe PDF, but you will lose some of your document properties with those methods. It isn’t the end of the world as you can add them back if you have access to Adobe Acrobat Pro, but we want to provide you with the most seamless PPT to PDF transition.
- Whatever you do, do not Print to PDF! This will create an inaccessible, image-based PDF.
When you are ready to create your PDF:
- Make sure you have added a Title to your file. (Go to File > Properties, then type in an appropriate title in the Title field)
- Then select File > Export
- Select Create PDF/XPS Document
- Select Create PDF/XPS button
- In the Publish as PDF or XPS window, enter a File Name and then select the Options button
- In the Options dialog window, make sure the following options are selected:
- Document properties: this selection ensures that the document title and author information are carried over into your PDF
- Document structure tags for accessibility: this selection ensures that any structural elements you created in your PowerPoint file (i.e., lists, headings, etc.) are tagged as such in your PDF

Accessible Google Docs and Slides
The accessibility principles in Google Docs and Slides are the same as the Microsoft products. The sections below outline the few key differences.
Tables
It is not possible to create an accessible table in Google Docs & Slides unless you have the Grackle Docs add-on installed. Go to the Accessibility Checker expander below for detailed Grackle installation instructions.
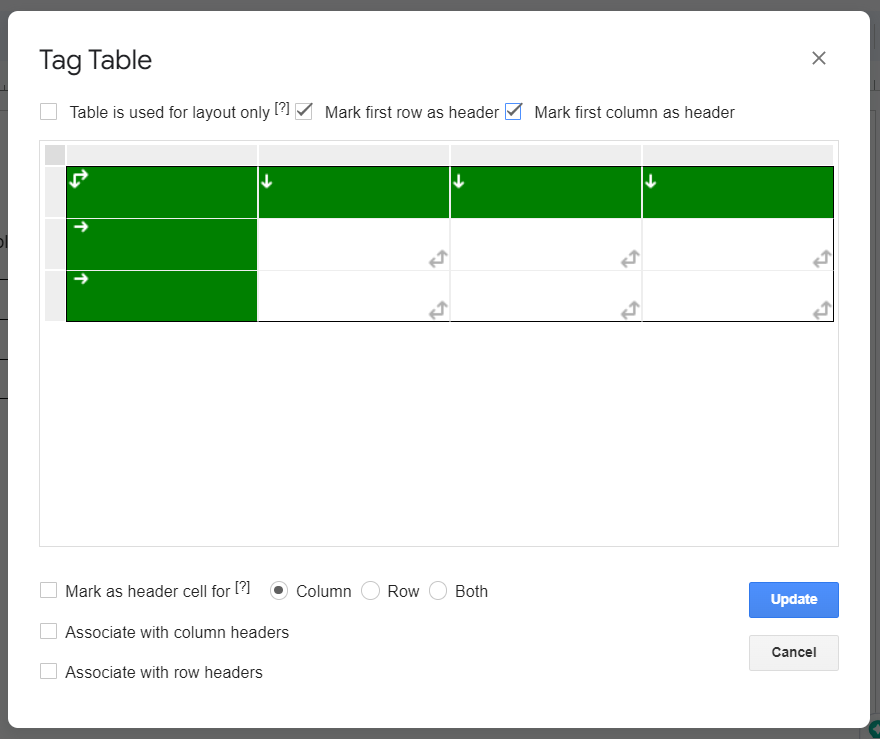
Using the Grackle Docs Add-on for Tables:
- Once the Grackle Docs accessibility check is complete, scroll down to Tables
- Select “Locate +TAG” under “Tables must be tagged or marked as layout tables”

- Mark your table header row and/or column using the checkboxes shown above the table
- Select the blue Update button to save the changes you made to your table
Accessibility Checker
To install the Grackle Docs Add-on:
- In a Google Doc, select Extensions > Add-ons > Get add-ons in the main toolbar
- The Google Workspace Marketplace will pop up
- Type Grackle Docs in the search bar and press Enter
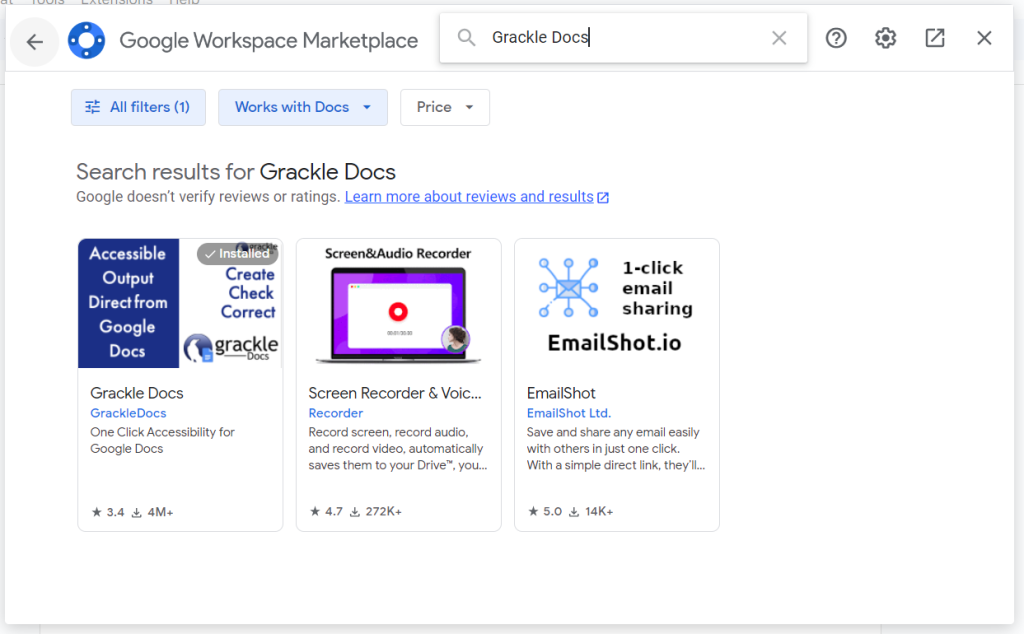
- Select the Grackle Docs card
- Select the blue Install button
- Select “Continue” in the permissions screen, select your Google account, then click “Allow”
- Once the add-on installation is complete, select “Done” and close the Google Workspace Marketplace window
Using the Grackle Docs Accessibility Checker:
- Select Add-ons in the main toolbar
- Select Grackle Docs, then Launch
- The Grackle Docs panel will open on the right side of the screen
- Once the check is complete, you will see a list of errors that need to be corrected marked with a red x icon
- Select the red x icon to get more information on the error
- Select “Locate +TAG” to correct the error

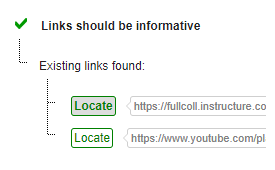
Note: Automated accessibility checkers are not perfect. An excellent example is the way Grackle Docs handles links. Both URLs from a test document (shown below) are quite long and not particularly informative to a student using a screen reader, but they both get the green checkmark in the Grackle Docs panel.
Links in the document:

Links with green checkmark in Grackle Docs:
Converting Docs to PDF
Once you have created an accessible Google Doc, you can download an accessible PDF.
- Go to the File menu
- Select Download
- Select the PDF Document option
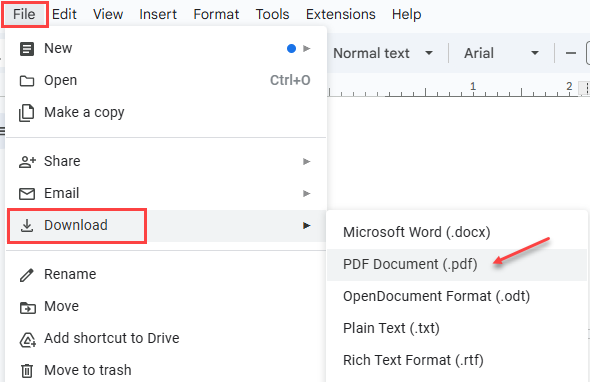
Please note that this option only works for Google Docs! PDFs downloaded from Google Slides are not accessible at this time.
Scanned PDFs
Remediating Scanned PDFs
Scanned PDFs are inherently inaccessible as they are typically just images that lack the necessary embedded text and structure that makes them accessible to students using a screen reader.
Follow this detailed, step-by-step guide from The Accessibility Guy to remediate a scanned PDF using Adobe Acrobat.
Faculty can also use UDOIT Cloud in Canvas to convert PDFs to Canvas Pages. The 4th video in the playlist below goes over how to do that.
What About Canva?
Canva is a popular tool for creating visually appealing documents, but unfortunately, its PDF outputs are largely inaccessible.
Canva Accessibility Features and Limitations
- Headings: allows users to add heading levels, but only H1 and H2, which is limiting
- Images: alt text can be added to images, but that alt text does not always export to PDF as expected
- Links: users can create hyperlinks, but the links lack important formatting features when exported to PDF
- Lists: users can create both bulleted and numbered lists, but these lists do not retain the proper structure when exported to PDF
- Tables: users can insert tables, but exported PDFs do not include any table structure
Try Venngage as a more accessible Canva alternative!
Venngage Accessibility Features
- Headings: supports multiple heading levels
- Images: alt text can be added to images
- Links: users can create hyperlinks that are appropriately tagged when exported to PDF
- Lists: users can create bulleted and numbered lists that are appropriately tagged when exported to PDF
- Tables: users can insert tables that are properly tagged with headers and rows when exported to PDF
- Accessibility Checker: Venngage includes a built-in accessibility checker that guides users in addressing accessibility issues like reading order, text size, color contrast, etc.
Document Conversion Tool
The Fullerton College Disability Support Services (DSS) office provides faculty and staff with an automated document conversion tool, SensusAccess, to assist in converting documents to more accessible formats. Detailed instructions on how to use the tool are on the DSS SensusAccess page.
Other AI remediation tools to try: