


DesignPLUS Quick Guides
The DesignPLUS tools from CIDI Labs are available in Fullerton College’s instance of Canvas. Using these tools, instructors can easily design eye-catching, accessible course content pages, create templates and modules, and adjust all due dates and default times in one place. The tools are available anywhere you can access the Canvas Rich Content Editor. Click the Canvas Edit button and then click the blue rocket ship on the upper right corner of the screen to launch the Design Tools menus.
The DesignPlus Multi-Tool
The DesignPLUS Multi-Tool helps you set up a course shell and build out your modules quickly. The Multi-Tool consists of three separate tools: the template creator, the module builder, and the due date modifier.
Adding the Multi-Tool to Your Course
Before you can use the Multi-Tool, you must add it to the navigation menu in your Canvas course.
- On the course navigation menu, click Settings.
- On the Settings page, click the Navigation tab.
- On the Navigation tab, enable the Multi-Tool or drag it from the list of hidden items (on the bottom) to the list of available items.
- Click Save
After you have added the Multi-Tool to your course navigation menu, you can launch it by clicking on the Multi-Tool item in your Canvas navigation menu.

The first time that you use it in any of your courses, the Multi-Tool prompts you to authorize access to your account. Once you have authorized it, you can use the Multi-Tool in any of your courses.
Building a Course with the Multi-Tool
With the Multi-Tool, you can do the following:
- Create a home page, publish it, and mark it as the Front page.
- Create templates for assignments, discussions, pages, and quizzes.
- Create new modules or add to existing modules.
- Update due dates, unlock dates, and lock dates from the same screen.
Template Builder Instructions

Create a Front Page
- On the course navigation menu, click Multi-Tool.
- On the Multi-Tool page, click Template Builder.
- Click the Create Front Page button
- Once created, click Edit Front Page to customize the Front Page.
Change the Front Page
- On the course navigation menu, click Multi-Tool.
- On the Multi-Tool page, click Page Templates.
- In the Front Page area, select a different page from the Change Font Page dropdown.
Create a Template
Using the Multi-Tool, you can create templates for assignments, discussions, content pages, and quizzes.
- On the course navigation menu, click Multi-Tool.
- On the Multi-Tool page, click Template Builder.
- In the Title field for the desired template type, enter a name for the new template.
- Click the Create Template button or hit Enter/Return on your keyboard.
Module Builder Instructions

Create New Module
The New Module Pattern is used to set up the number and arrangement of module items that will be customized before creating the modules.
To set a module pattern, follow these steps:
- On the course navigation menu, click Multi-Tool.
- On the Multi-Tool page, click Module Builder.
- On the Module Builder page, go to New Module Pattern.
- Select your options.
- Click Generate Module List.
- Customize the Module List as needed.
- Click Add Modules to Course.
Update an Existing Module
To update an existing module, follow these steps:
- On the course navigation menu, click Multi-Tool.
- On the Multi-Tool page, click Module Builder.
- On the Module Builder page, select the module to update under Existing Modules.
- Make desired changes.
- Click Update This Module.
Save Progress
When you are setting up the module structure for a course, the progress will automatically save every few minutes so you do not lose your customizations. This allows you come back and continue building the course later. To make sure progress is saved before leaving the tool click the Save Progress button. When you come back into the tool, previously saved content will be loaded. Content is not created inside your course until you choose Add Modules to Course.
Due Date Modifier Instructions

Overview
With the Due Date Modifier, you can modify all of your course due dates in one place. You can add or modify:
- Dues dates for assignments, discussions, and quizzes
- Assignment availability dates
- Quiz show/hide answer dates
- Page to do dates
Modify a Date
- On the course navigation menu, click Multi-Tool.
- On the Multi-Tool main page, click Due Date Modifier.
- On the Due Date Modifier page, add or change dates by typing a new date or selecting the date from the pop-up calendar.
- Click the Update button.
Set Blackout Dates & Days
Blackout Dates allow you to identify dates that you want to avoid when setting assignment dates. Dates or days of the week specified will not be selectable using the pop-up calendar.
Dates:
- On the course navigation menu, click Multi-Tool.
- On the Multi-Tool main page, click Due Date Modifier.
- Open the Set Blackout Dates panel.
- Use the date picker in the Blackout Dates field to pick specific dates.
Days of the Week:
- On the course navigation menu, click Multi-Tool.
- On the Multi-Tool main page, click Due Date Modifier.
- Open the Set Blackout Dates panel.
- Check the box next to the Checkout Days you wish to blackout.
Set Default Times
You can set default times that will auto-populate when you select a date.
- On the course navigation menu, click Multi-Tool.
- On the Multi-Tool main page, click Due Date Modifier.
- Open the Set Default Times panel.
- Use the time picker in the pick the desired default time.
Bulk Updates
- On the course navigation menu, click Multi-Tool.
- On the Multi-Tool main page, click Due Date Modifier.
- Open the Bulk Updates panel.
- Check the box next to the desired item(s) in the Assignment Data table.
- Selected items will be listed in the Bulk Updates panel.
- Move dates forward or backward a set number of days.
- In the Bulk Day Adjust section, check the box next to each of the date types you would like to adjust.
- Enter a positive or negative number of days (Examples: entering 7 will move the dates forward one week; entering -7 will move the dates back one week).
- Click the Adjust Dates button to shift the listed dates.
- Click the Update Canvas button to push updates to Canvas.
Existing Content & the Design Tool
It may be easier to style existing course pages and/or copy existing content than to format content and build modules from scratch. The Create/Edit Content section of the Design Tool contains the basic tools you will need for building out your course content pages.
Styling Existing Content Pages

- Navigate to the content page you want to change.
- Launch the Design Tool.
- Click the green puzzle piece in the Design Tool to choose a theme.
- Customize banner text as needed.
- Add/Rearrange Content Blocks:
- Highlight each group of text you want to copy in the Canvas Rich Content Editor.
- Click “Selection to Block” button to move all of this content into the Design Tool.
- Click “Remove Empty” button to get rid of any empty content blocks.
Copying Content Pages
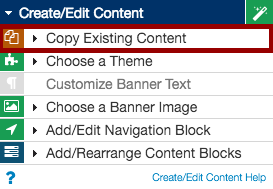
- Create a new page.
- Launch the Design Tool.
- Create/Edit Content.
- Copy Existing Content:
- Choose from your template pages, all course pages, and/or institutional template pages.
- You can also copy from any page in the FC instance of Canvas using the URL from that page, but keep in mind that this feature only copies the HTML from the page. Images and other assets will not be copied over.
Download and print a copy of the DesignPLUS Quick Guide to keep at your desk for reference as you build your Canvas courses.